A Millions Ways to use the CMF
Credmark Model Framework
Kunlun Yang
2022/12/22

Resources to check-out:
In March 2022, we launched the open beta of the Credmark Model Framework (“CMF”)¹,. At that time, working with the CMF was simple but restrictive. Developers could build models locally, deploy them, and then access them via an API. Since then we have turned the CMF into a full-fledged development environment for quants, data scientists, and programmers.
TL;DR
In the Beginning
In March, working with the CMF required developers to follow a three-stage cycle.
- First, they wrote models in Python.
- Second, they used the script credmark-dev to run those models in their local environment.
- And third, once models were fully tested, developers could make a pull request to have their models deployed into the Credmark Gateway.
The Console
As we developed a larger number of models with increasing complexity, our initial development system became a bottleneck. Debugging and experimenting were difficult. We needed a REPL environment, so we built the CMF Console.
The CMF Console provides an interactive development environment equivalent to an IPython shell. In that environment, developers have access to CMF data structures, base models, Web3, and our indexed data, just as they do when their models are run in production. They can therefore experiment and explore until they are ready to commit to building a deployable script.
Jupyter Notebook
Taking the Console idea one step further, we found a way to embed the CMF into a Jupyter Notebook and any Python script. Setup instructions can be found here².
The API
Once deployed, models can be called using the DeFi API. This allows any developer to embed model output into an application.
More Details
credmark-dev
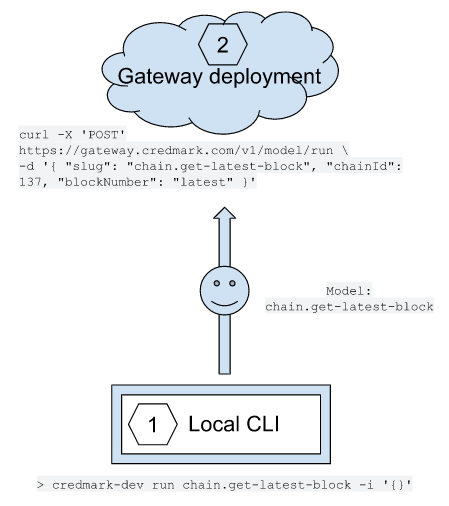
The following diagram illustrates how model development works using the CLI script credmark-dev.

This setup requires a local installation of Python, framework and models, which has been documented here³.
credmark-dev run price.quote -i '{"base": {"address":"0xD533a949740bb3306d119CC777fa900bA034cd52"}}' -jThe two required parameters are
- (1) the model name, in this case
price.quote- (2) the model’s inputs, in this case the JSON dictionary
{"base": {"address":"0xD533a949740bb3306d119CC777fa900bA034cd52"}}.Block number defaults to the latest available, and chain ID defaults to Ethereum Mainnet. Optional arguments include:
- -j for pretty printing the JSON output,
- -b to specify the block number at which the model should be run, and
- -c to specify the chain ID.
Models run by credmark-dev have full access to:
- the CMF’s builtin types (Token, Contract, Account, etc.),
- the current state of the blockchain,
- past states of the blockchain, and of course
- any Python library.
This allows developers to leverage a rich ecosystem of data analytics and machine learning libraries to process blockchain data.
The Console
When we are inside the local directory for our models repo⁴, we can launch the CMF Console as follows:
> cd credmark-models-py
> credmark-dev run console
2022-12-06 17:04:57,623 - credmark.cmf.engine.context - INFO - Using latest block number 16124564
Entering Credmark Model Console at block 16124564.
Help: help(), Quit: quit()
Available vars: context, models, ledger, web3, etc.
Available types: BlockNumber, Address, Contract, Token…

In [1]:
By default, the context is created for the latest block. Optionally, we can add -b {block_number} when launching the Console to specify a block number.
This is a CMF-enhanced IPython console. For example, we can type models.<tab> to show the list of models that can be run.

Returning to the example used to demonstrate the CLI tool, let’s run the price.cex model in the Console:
In [4]: models.price.quote(base={"address":"0xD533a949740bb3306d119CC777fa900bA034cd52"})

Out[4]:
{'price': 0.5639462678896459,
 'src': 'dex|uniswap-v2,sushiswap,uniswap-v3|Non-zero:11|Zero:4|4.0',
 'quoteAddress': '0x0000000000000000000000000000000000000348'}
In this environment, we can use the rich types defined in the CMF for Web3 and DeFi. We can see the definition of the model price.quote in the models repository:
@Model.describe(
	slug='price.quote',
	version='1.11',
	display_name=('Credmark Token Price with preference of cex or dex (default), '
              	'fiat conversion for non-USD from Chainlink'),
	description='Credmark Token Price from cex or dex',
	developer='Credmark',
	category='protocol',
	tags=['token', 'price'],
	input=PriceInputWithPreference,
	output=PriceWithQuote,
	errors=PRICE_DATA_ERROR_DESC)
Let’s pay particular attention to the input and output types.
The input field is of type PriceInputWithPreference, which is a data transfer object (DTO) that contains two fields, base and quote, both of which are of type Currency. A Currency is a factory which can create objects of type Token, NativeToken, and FiatCurrency. Note that quote is optional as it defaults to FiatCurrency('USD').
Let’s change our call to pass the model a Token object instead of a dictionary.
In [6]: price = models.price.quote(base=Token("0xD533a949740bb3306d119CC777fa900bA034cd52"))

In [7]: price['price']
Out[7]: 0.5639462678896459
By default, the result is a Python dictionary derived from a JSON object. We can, however, specify the type of the output and the result will be cast to that type (if possible of course).
In this case, we want our return value to be an object of type PriceWithQuote. We can then query that object as needed.
In [9]: price = models.price.quote(base=Token("0xD533a949740bb3306d119CC777fa900bA034cd52"), return_type=PriceWithQuote)

In [10]: price
Out[10]: PriceWithQuote(price=0.5639462678896459, src='dex|uniswap-v2,sushiswap,uniswap-v3|Non-zero:11|Zero:4|4.0', quoteAddress='0x0000000000000000000000000000000000000348')

In [11]: price.price
Out[11]: 0.5639462678896459

In [12]: price.src
Out[12]: 'dex|uniswap-v2,sushiswap,uniswap-v3|Non-zero:11|Zero:4|4.0'
So far we’ve used the Console the same way we used the CLI tool, to run a model. Now, let’s use it to do a bit of exploration.
A Token object represents an ERC-20 token contract. It exposes the ERC-20 interface as object properties, e.g., symbol, name, decimals, and totalSupply. We can use properties .symbol, .name, etc. to get their values. Below is the code and the Console’s output.
In [13]: crv_token = Token('0xD533a949740bb3306d119CC777fa900bA034cd52')

In [14]: crv_token.name, crv_token.symbol, crv_token.decimals, crv_token.total_supply
Out[14]: ('Curve DAO Token', 'CRV', 18, 1870929444195814473133522745)
The Token class inherits from Contract. With objects of either class, we can call associated smart contract functions. For example, we can load the Uniswap V3 NFT contract and look up the owner for positionID 122. Below is the code and the console’s output.
In [15]: univ3_nft = Contract('0xC36442b4a4522E871399CD717aBDD847Ab11FE88')

In [16]: univ3_nft.functions.ownerOf(122).call()
Out[16]: '0x59f1Fee07dC77dDD0d6801C7eCE4DA44744A96a2'
We can even query the contract’s ABI.
In [17]: univ3_nft.abi.functions
Out[17]: Functions: [DOMAIN_SEPARATOR, PERMIT_TYPEHASH, WETH9, approve, balanceOf, baseURI, burn, collect, createAndInitializePoolIfNecessary, decreaseLiquidity, factory, getApproved, increaseLiquidity, isApprovedForAll, mint, multicall, name, ownerOf, permit, positions, refundETH, safeTransferFrom, selfPermit, selfPermitAllowed, selfPermitAllowedIfNecessary, selfPermitIfNecessary, setApprovalForAll, supportsInterface, sweepToken, symbol, tokenByIndex, tokenOfOwnerByIndex, tokenURI, totalSupply, transferFrom, uniswapV3MintCallback, unwrapWETH9]

In [18]: univ3_nft.abi.events
Out[18]: Events: [Approval, ApprovalForAll, Collect, DecreaseLiquidity, IncreaseLiquidity, Transfer]

In [19]: univ3_nft.abi.functions.balanceOf
Out[19]:
Function Name: balanceOf
Args: ['owner']
Types: ['address']
Output: ['uint256']
The NFT contract has a function to look up for the position given a NFT ID.
In [23]: univ3_nft.functions.positions(122).call()
Out[23]:
[0,
 '0x0000000000000000000000000000000000000000',
 '0x6B175474E89094C44Da98b954EedeAC495271d0F',
 '0xC02aaA39b223FE8D0A0e5C4F27eAD9083C756Cc2',
 3000,
 -109260,
 -84000,
 464824267666178749,
 0,
 0,
 0,
 0]
The output contains the pool liquidity, 464824267666178749, the fee, 3000, and the token addresses, 0x6B175474E89094C44Da98b954EedeAC495271d0F and 0xC02aaA39b223FE8D0A0e5C4F27eAD9083C756Cc2.
To obtain the exact amount of tokens, the user will have to be familiar with Uniswap v3’s documentation. This has been encoded into two models, uniswap-v3.lp, and uniswap-v3.id, which have been deployed and are therefore usable by anyone using the CMF.
The first model takes an address as input and the second model takes the NFT id. Let’s run these models. The output of the two models are slightly different because uniswap-v3.lp returns a list of positions of this LP and uniswap-v3.id returns a single position.
In [26]: models.uniswap_v3.lp(lp='0x59f1Fee07dC77dDD0d6801C7eCE4DA44744A96a2')
Out[26]:
{'lp': '0x59f1fee07dc77ddd0d6801c7ece4da44744a96a2',
 'positions': [{'lp': '0x59f1fee07dc77ddd0d6801c7ece4da44744a96a2',
   'id': 122,
   'pool': '0xc2e9f25be6257c210d7adf0d4cd6e3e881ba25f8',
   'tokens': [{'amount': 0,
 	'asset': {'address': '0x6b175474e89094c44da98b954eedeac495271d0f'},
 	'fee': 0.0538309631361015},
	{'amount': 0.005000000000002038,
 	'asset': {'address': '0xc02aaa39b223fe8d0a0e5c4f27ead9083c756cc2'},
 	'fee': 1.1675738604881406e-05}],
   'in_range': 'out of range'}]}

In [27]: models.uniswap_v3.id(id=122)
Out[27]:
{'id': 122,
 'lp': '0x59f1fee07dc77ddd0d6801c7ece4da44744a96a2',
 'pool': '0xc2e9f25be6257c210d7adf0d4cd6e3e881ba25f8',
 'tokens': [{'fee': 0.0538309631361015,
   'asset': {'address': '0x6b175474e89094c44da98b954eedeac495271d0f'},
   'amount': 0},
  {'fee': 1.1675738604881406e-05,
   'asset': {'address': '0xc02aaa39b223fe8d0a0e5c4f27ead9083c756cc2'},
   'amount': 0.005000000000002038}],
 'in_range': 'out of range'}
Note that we are using the models object to run models. With models, we need to change the dash “-” in the model name to underscore “_” to make the model name conform to Python’s naming convention. Alternatively, we can use function context.run_model to run the model.
In [28]: context.run_model('uniswap-v3.id', input={"id":122})
Out[28]:
{'id': 122,
 'lp': '0x59f1fee07dc77ddd0d6801c7ece4da44744a96a2',
 'pool': '0xc2e9f25be6257c210d7adf0d4cd6e3e881ba25f8',
 'tokens': [{'fee': 0.0538309631361015,
   'asset': {'address': '0x6b175474e89094c44da98b954eedeac495271d0f'},
   'amount': 0},
  {'fee': 1.1675738604881406e-05,
   'asset': {'address': '0xc02aaa39b223fe8d0a0e5c4f27ead9083c756cc2'},
   'amount': 0.005000000000002038}],
 'in_range': 'out of range'}
We can obtain in-line help from the model with a prefix of question mark “?”. It describes the model’s input and output in detail.
In [29]: ?models.uniswap_v3.id
Call signature:
models.uniswap_v3.id(
	input: Union[pydantic.main.BaseModel, credmark.dto.IntDTO, credmark.dto.StrDTO, credmark.dto.FloatDTO, dict, NoneType] = None,
	return_type: Union[dict, Type[Union[pydantic.main.BaseModel, credmark.dto.IntDTO, credmark.dto.StrDTO, credmark.dto.FloatDTO]], NoneType] = None,
	version: Optional[str] = None,
	**kwargs,
) -> Union[dict, pydantic.main.BaseModel, credmark.dto.IntDTO, credmark.dto.StrDTO, credmark.dto.FloatDTO]
Type:       	RunModelMethod
String form:	<credmark.cmf.model.models.RunModelMethod object at 0x7f98aa02c790>
Namespace:  	Interactive (global)
File:       	~/dev/credmark/credmark-model-framework-py/credmark/cmf/model/models.py
Docstring:
uniswap-v3.id
- slug: uniswap-v3.id
- version: 0.2
- displayName: Uniswap v3 LP Position and Fee for NFT ID
- description: Returns position and Fee for NFT ID
- developer:
- category: protocol
- subcategory: uniswap-v3
- tags: None
- input schema (* for required field):
  V3IDInput(V3IDInput(*))
	└─id(integer)
- input example:
  #01: {"id": "integer"}
- output schema (* for required field):
  V3LPPosition(V3LPPosition(*))
	└─lp(string)
	└─id(integer)
	└─pool(string)
	└─tokens(List[PositionWithFee])
    	└─amount(number)
    	└─asset(Token(*))
        	└─address(string)
    	└─fee(number)
	└─in_range(string)
- output example:
  #01: {"lp": "string", "id": "integer", "pool": "string", "tokens": [{"amount": "4.2", "token": {"address": "0x7Fc66500c84A76Ad7e9c93437bFc5Ac33E2DDaE9"}}], "in_range": "string"}
- errors:
  No defined errors
- class: models.credmark.protocols.dexes.uniswap.uniswap_v3.UniswapV2LPID
- mclass: <class 'models.credmark.protocols.dexes.uniswap.uniswap_v3.UniswapV2LPID'>
In some cases we may want information about our current context. For example, we can get the block_number and its associated timestamp.
In [30]: block_number
Out[30]: 16218748

In [31]: block_number.timestamp_datetime
Out[31]: datetime.datetime(2022, 12, 19, 12, 29, 59, tzinfo=datetime.timezone.utc)

In [32]: block_number.timestamp
Out[32]: 1671452999
As you can see, the CMF Console allows interactive exploration which quickly becomes an indispensable part of model development.
Jupyter Notebooks
As wonderful as the CMF Console might be, it can’t beat the same functionality embedded into a Jupyter Notebook!
Here’s how that works.
Prerequisites
We previously cloned the credmark-models-framework-py repository. We also needed to install the credmark-models-py repository so that we edit and run models locally. After cloning the repository:
> cd credmark-models-py
> pip install -e .
Import and use the CMF
Copy and paste the following code into a Jupyter notebook to set up the CMF environment.
from credmark.cmf.ipython import create_cmf
from credmark.cmf.types import Token, Contract, Address, Account, BlockNumber

cmf_param = {
   'block_number': None
}
context, _model_loader = create_cmf(cmf_param)
By setting block_number to None we will always use the latest block. This can of course be changed at any time.
We can now write code as we did in the CMF Console.
For example, we can create Token object:
crv_token = Token('0xD533a949740bb3306d119CC777fa900bA034cd52')
(crv_token.symbol, crv_token.decimals, crv_token.functions.rate().call())
To run a model, we use the context object from the CMF. There is a context.run_model function to run a model.
context.run_model('price.cex', {'base': crv_token})We can of course ask the context for its block number.
context.block_numberWe can generate pandas DataFrame from the output of some models and use those for data analysis.
df = context.run_model(
   'uniswap-v2.lp-fee-history',
   {"pool": "0xB4e16d0168e52d35CaCD2c6185b44281Ec28C9Dc", "lp": "0x76E2E2D4d655b83545D4c50D9521F5bc63bC5329"},
    return_type=Records).to_dataframe()
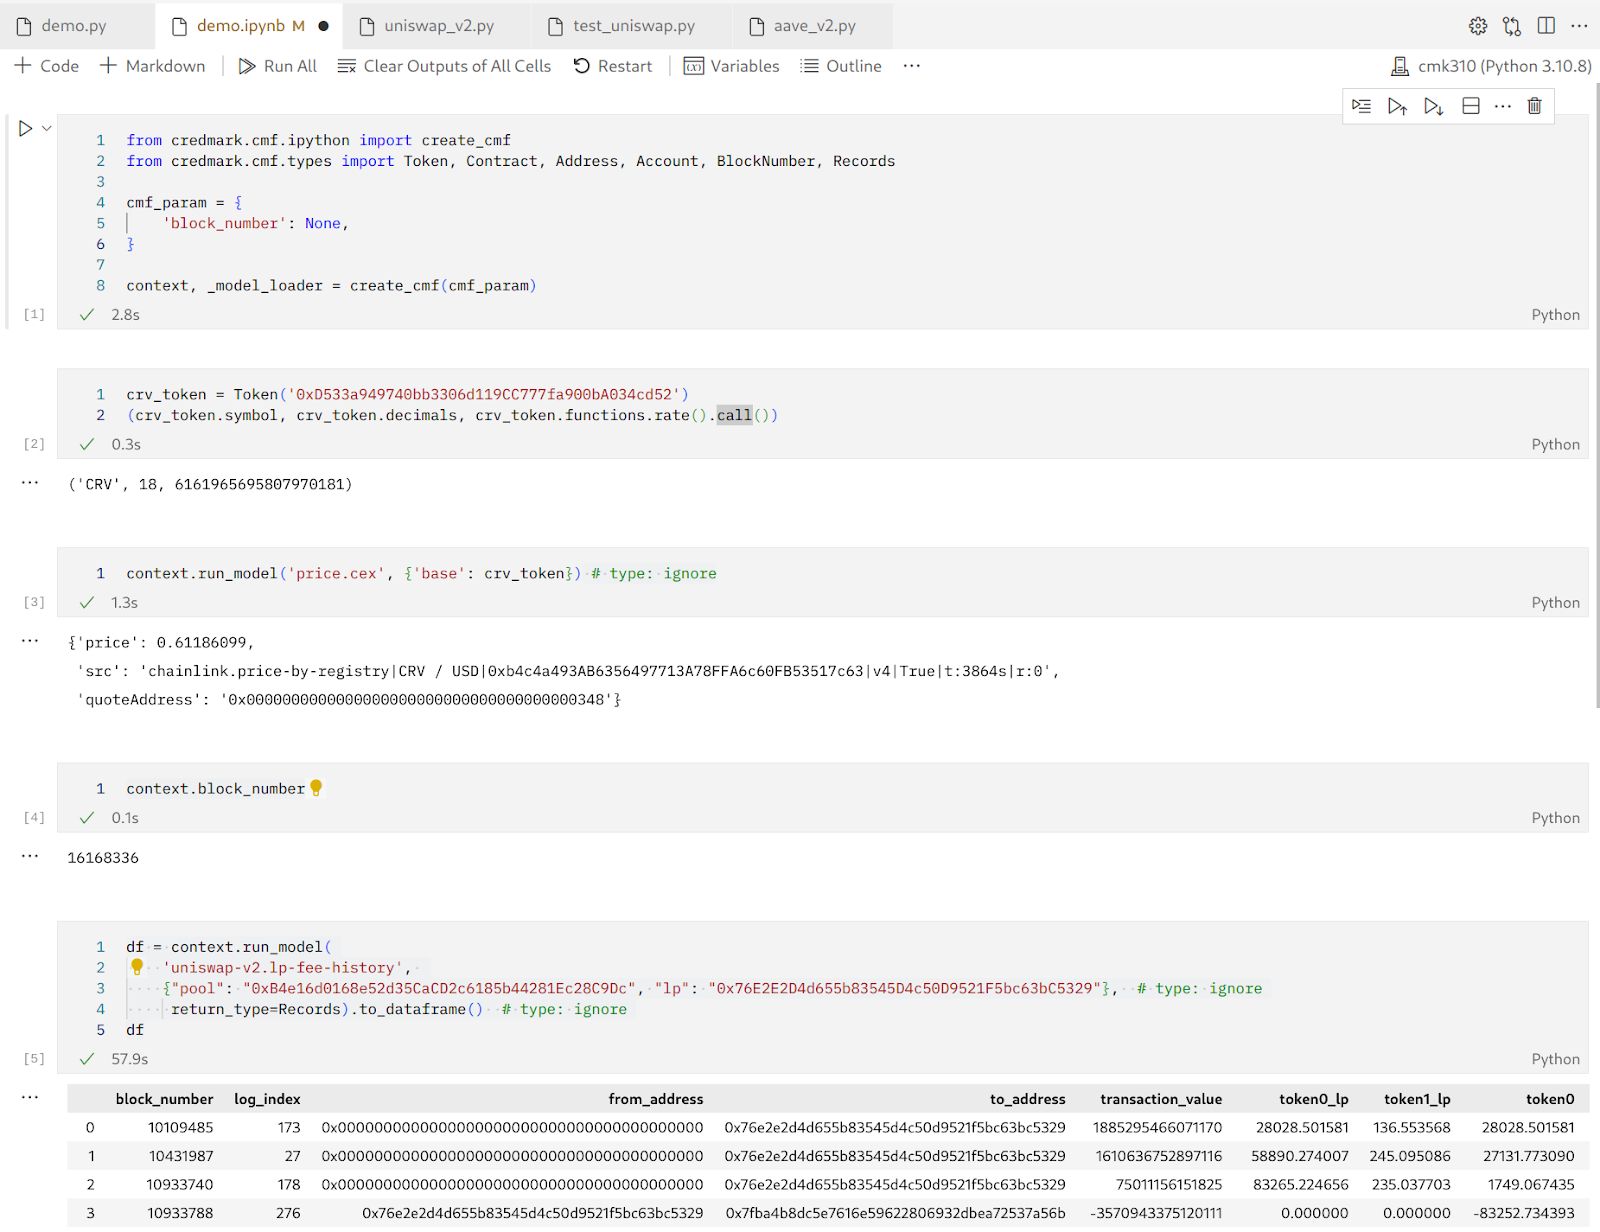
Below is a screenshot of a Jupyter notebook with above code.

Putting it Together
The Components
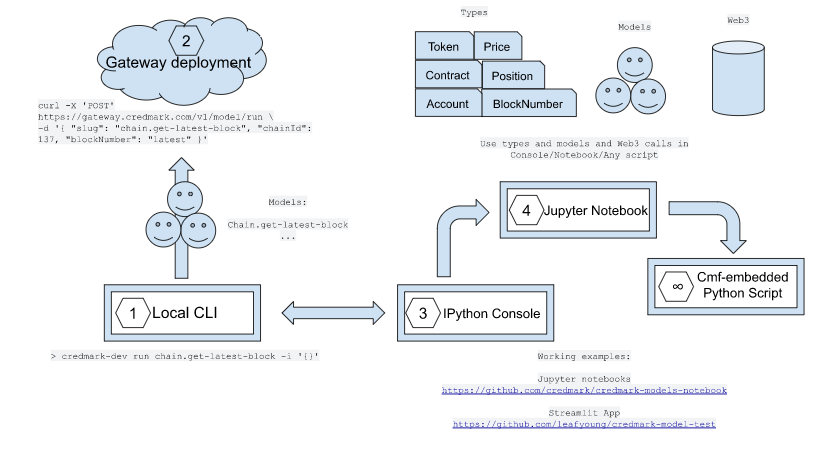
The following diagram shows how all of the components mentioned so far fit together. This includes:
- the production deployment environment (Gateway),
- the local CLI,
- the Console (IPython),
- Jupyter Notebooks, as well
- the CMF components: types, models, web3 access, etc.

Now that we know the many ways we can build and deploy models, let’s see how we can consume them via the DeFi API.
The API
Here’s how anyone with an API key can call the price.quote model we deployed using curl:
curl -X 'POST' \
  'https://gateway.credmark.com/v1/model/run' \
  -H 'accept: application/json' \
  -H 'Content-Type: application/json' \
  -H "Authorization: Bearer $CREDMARK_API_KEY" \
  -d '{
  "slug": "price.quote",
  "chainId": 1,
  "blockNumber": "latest",
  "input": {
    "base": {
      "address": "0xD533a949740bb3306d119CC777fa900bA034cd52"
    }
  }
}'
There are hundreds of deployed models. If you want to find one that suits your needs, look at our gateway.
You could do the same from within aPython script:
import os
import requests
import json

api_key = os.environ.get('CREDMARK_API_KEY')

headers = {
   'Authorization': 'Bearer ' + api_key,
   'Content-Type': 'application/json'}

payload = {
 "slug": "price.quote",
 "chainId": 1,
 "blockNumber": "latest",
 "input": {
   "base": {
     "address": "0xD533a949740bb3306d119CC777fa900bA034cd52"
   }
 }
}

crv_token_price = requests.post('https://gateway.credmark.com/v1/model/run',
     headers=headers,
     data=json.dumps(payload))

result = crv_token_price.json()
We have shared the examples in Jupyter notebooks⁵ and a data visualization application⁶.
Summary
In this post, we introduced the many ways to use the Credmark Model Framework. At the start, we could only use the CMF to run models. Eventually we improved our environment by providing ways to interactively explore everything the CMF has to offer. We can now seamlessly call smart contract functions and perform data analytics on the output with Python data science packages.
Footnote
¹ https://www.youtube.com/watch?v=As161srbne0
² https://docs.credmark.com/cmf-model-guide/getting-started/installation-and-setup
³ https://github.com/credmark/credmark-models-py
⁴ https://docs.credmark.com/cmf-model-guide/getting-started/installation-and-setup
⁵ https://github.com/credmark/credmark-models-notebook
⁶ https://github.com/leafyoung/credmark-model-test
About Credmark
Credmark runs a financial modeling platform powered by reliable on-chain data. We curate and manages DeFi data making it available via API and the Snowflake Marketplace around the globe and across industries.
Our community of quants, developers, and modelers actively build models for the DeFi community by leveraging our data API and tools. Join the growing community and together we will advance the next-generation financial system.
Sign up for our newsletter for the latest product updates, partnerships, and more.